Drizzle and SvelteKit Integration - The Ultimate Stack
| Published: February 28, 2024
| Updated: March 13, 2024
Drizzle is an ORM which is the glue between your SvelteKit backend and the database. Using pure typescript, you can define a database schema and write simple data fetches and inserts to the database without any raw SQL commands.
On top of this, you get built-in type-safety and intellisense for all database calls, due to the schema being written in typescript within the same repo.

It’s a compelling stack, and the explosive popularity of Drizzle has taken a large market-share from the well-established Prisma ORM.
SvelteKit brings the server, and drizzle brings the query layer. But to get started, there’s a setup process. So in this article, we’ll walk through the process of getting your SvelteKit app from 0 to fully integrated with Drizzle.
Installing Drizzle
Assuming you have already created your Sveltekit app, we’ll have to install a few Drizzle packages:
drizzle-orm: The base package which allows you to define your schema and build SQL commands using the Drizzle typescript syntax,drizzle-kit: A package to assist with database migrations, and also comes bundled with Drizzle Studio - A UI to visualize your database tables, and make data inserts and changes,- Your database provider’s driver (adapter) for Drizzle.
Let’s start by installing the first 2 packages.
Install the Drizzle Base Packages
In your terminal, make sure you’re in the app root and run these 2 commands:
npm i drizzle-orm
npm i -D drizzle-kit
Then we need to figure out which adapter we need to install for our database provider.
Install Your Specific Database Driver
Use the tool below to find your specific database driver, and click it to get the most up-to-date installation process:
You may notice some additional instructions with your link - we’ll come back to this later in the Connect to database section.
Once you’ve installed the packages relevant to your database, it’s time to start integrating it in our app.
Create the Schema
The purpose of the schema is to define the shape of our data. For example, if we want to store information about a user, in our schema, we:
- create a
Userstable, and - list the properties of the user we wish to store - along with each property’s type.
To create your Drizzle schema in SvelteKit, you’re going to create a file called schema.ts and paste the following code:
src/lib/server/schema.ts
// This should only apply if you're using postgreSQL
// For MySQL and SQLite Schema examples, follow this link:
// https://orm.drizzle.team/docs/sql-schema-declaration

import { pgTable, serial, text, varchar } from 'drizzle-orm/pg-core';
import { drizzle } from 'drizzle-orm/node-postgres';

export const usersTable = pgTable('users', {
	id: serial('id').primaryKey(),
	fullName: text('full_name'),
	phone: varchar('phone', { length: 256 })
});
Note the src/lib/server/schema.ts path we had to create - we will be putting most of the Drizzle-related files in this folder.
You can also spread your schemas across multiple files or folders by following this guide, however in the vast majority of cases you can keep all your schema’s in the one schema.ts file.
You’ll have to add more tables and change the properties to suit your application, however this should be a good start. There’s plenty of column types which you can find here:
Column types represent the data type you want to store, e.g. text, an integer, a timestamp, or a boolean etc. They are required when you create your schema.
Push the Schema To The Database
Assuming we have already spun up a database and included the credentials in our .env environment variables, we’ll need to push the declared state of our schema to the actual database. We do this with Migrations.
We’ll first have to create a drizzle.config.ts file in the root of our project.
drizzle.config.ts
import type { Config } from 'drizzle-kit';
import { env } from '$env/static/private';

export default {
	schema: './src/lib/server/schema.ts',
	out: './drizzle',
	driver: 'pg', // 'pg' | 'mysql2' | 'better-sqlite' | 'libsql' | 'turso'
	dbCredentials: {
		host: env.DB_HOST,
		user: env.DB_USER,
		password: env.DB_PASSWORD,
		database: env.DB_NAME
	}
} satisfies Config;
Depending on the specific database you chose, you’ll need to change the
driverproperty to suit your Database.
Generate the Migration
We now need to generate the migration. This process observes your schema (based on the directory set in the schema prop of your drizzle.config.ts file), and converts it to an SQL file, which is outputs to the directory specified for the out property in your drizzle.config.ts file.
Note: At this stage, your physical database will still not be changed - this just prepares the SQL which we’ll later push under the hood.
The generation command you should use will depend on the type of database you’re using. In your terminal, run one of the commands in the table below, depending on your database type:
| Database | Command |
|---|---|
| PostgreSQL | npx drizzle-kit generate:pg |
| MySQL | npx drizzle-kit generate:mysql |
| SQLite | npx drizzle-kit generate:sqlite |
Now let’s look at how to push the generated SQL to the physical database.
Pushing a migration
Much like the migration generation step, the command you run in your terminal will depend on the database you’re using. So to push directly to the database, use one of the following commands:
| Database | Command |
|---|---|
| PostgreSQL | npx drizzle-kit push:pg |
| MySQL | npx drizzle-kit push:mysql |
| SQLite | npx drizzle-kit push:sqlite |
Your database should now reflect the shape specified in your schema. If you need to make changes to the schema, you can do so and then run the generate and push commands again to update the database.
Now we have set up the shape of our database tables, we’ll need to create the connection to the physical database so that we can call for the data, and make migrations.
Connect to the database and expose the db object
Now we have the schema, we’ll need to:
- Connect our application to the database,
- Use the schema to infer the type and shape of our database
We’ll do both by creating a db.ts file in the same directory as the schema.ts file and copying the following code:
You may have already completed this step from when we installed the specific driver from the official docs. If you have, you can leave as it, or move the
dbobject to the followingsrc/lib/server/db.tsfile.
src/lib/server/db.ts
import { drizzle } from 'drizzle-orm/postgres-js';
import postgres from 'postgres';
import { env } from '$env/static/private';

// There are multiple ways to initialize the client
// Go to one of these pages to find your implementation:
// postgreSQL: https://orm.drizzle.team/docs/get-started-postgresql
// MySQL: https://orm.drizzle.team/docs/get-started-mysql
// SQLite: https://orm.drizzle.team/docs/get-started-sqlite
// The following is an example for supabase:

const client = postgres(env.DATABASE_URL);

export const db = drizzle(client);
It’s a good idea to expose your db from this src/lib/server/db.ts file, however if you have it located elsewhere it won’t be a problem.
Just make sure you flag db with export so that you can call it in other files accesse by your backend.
It’s important to know that db can be invoked anywhere in your app, so long as it isn’t run on the client. This is because it uses the private DATABASE_URL environment variable to initialize the client, and therefore the db object too.
Now that we have exported the connected db, lets use it to fetch and post data to the database.
Access Your Data
The base of Drizzle is now set up and we can start using it to build our app.
If you want to get data from your database, you can call it in your load functions (from +page.server.ts files).
Queries in Drizzle
Continuing our example from above, let’s get all users from the database in our load function, so that we can pass it to a /dashboard page:
src/routes/dashboard/+page.server.ts
import { db } from '$lib/server/db';

export async function load() {
	const users = await db.query.usersTable.findMany();
	return users;
}
And now you have a typed response, based on shape of the usersTable table in the schema.
This is a simple query, however you can set filters and set all kinds of parameters using the drizzle query options.
Inserting data to the database
Since we still have an empty database, querying for data is pointless - so let’s fix this.
We can push data to our database using form actions, or API endpoints.
For this example, we’ll make an insert in a form action in the same file as the load function used above:
src/routes/dashboard/+page.server.ts
import { db } from '$lib/server/db';

// ..."load" function

export const actions = {
	register: async function ({ cookies, request }) {
		const data = await request.formData();
		const fullName = data.get('fullName');
		const phone = data.get('phone');

		const newUser = await db.insert(usersTable).values({ fullName, phone });
		// With postgreSQL and SQLite, you can append `.returning()` to the statement to get the new user

		return { success: true, newUser };
	}
	// other actions...
};
Then you make a form on your front-end to call the register form action to insert the data.
So now we’ve:
- Set up Drizzle,
- Created the schema,
- Synced the database with the schema in our app,
- Pushed data to the db, and
- Queried data from the db
This is most of what you’ll need to do with Drizzle, however if you plan on creating a medium-large sized application with several backend functions, it’s a good idea to organize your backend functions with a router.
Create a router for backend functions
Routers can be repositories of categorized backend functions. If you have a large app, it might be worth splitting your backend functions into multiple files.
For example, create a router folder (src/lib/server/router) with 2 files:
src/lib/server/router/users.ts, andsrc/lib/server/router/locations.ts.
So now all relevant backend functions related to users goes in the first file, and the functions related to locations goes in the second file.
These files could look something like this:
src/lib/server/router/users.ts
import { db } from '$lib/server/db';
import * as schema from '$lib/server/schema';

export type User = typeof schema.usersTable.$inferSelect; // return type when queried
export type NewUser = typeof schema.usersTable.$inferInsert; // insert type

export async function getAllUsers(): Promise<User> {
	return db.query.usersTable.findMany();
}

export async function createNewUser(user: NewUser): Promise<User[]> {
	return db.insert(users).values(user).returning();
}

// other functions...
And now it’s easy to call these functions without having to deal with the implementation in your load functions or form actions:
src/routes/dashboard/+page.server.ts
import { getAllUsers, createNewUser } from '$lib/server/router/users';

export async function load() {
	return await getAllUsers();
}

export const actions = {
	register: async function ({ cookies, request }) {
		const data = await request.formData();
		const fullName = data.get('fullName');
		const phone = data.get('phone');

		const newUser = await createNewUser({ fullName, phone });

		return { success: true, newUser };
	}
	// other actions...
};Now that we’ve covered all the code side of things, let’s look at an easy way to observe your data with a pre-built UI.
An Interface for your database tables
The Drizzle team have created an awesome UI which allows your to see and edit the data in your tables without having to:
- create a specific UI for it, or
- write SQL commands in your terminal.
This tool is called Drizzle Studio, and it’s included in the drizzle-kit package we installed earlier.
Drizzle Studio
To open Drizzle Studio, run the following command to open up the UI:
npm run drizzle-kit studioOnce you run this command, you will be provided with a port to access it on your device with localhost.
Once you open it, you’ll see something similar to this:
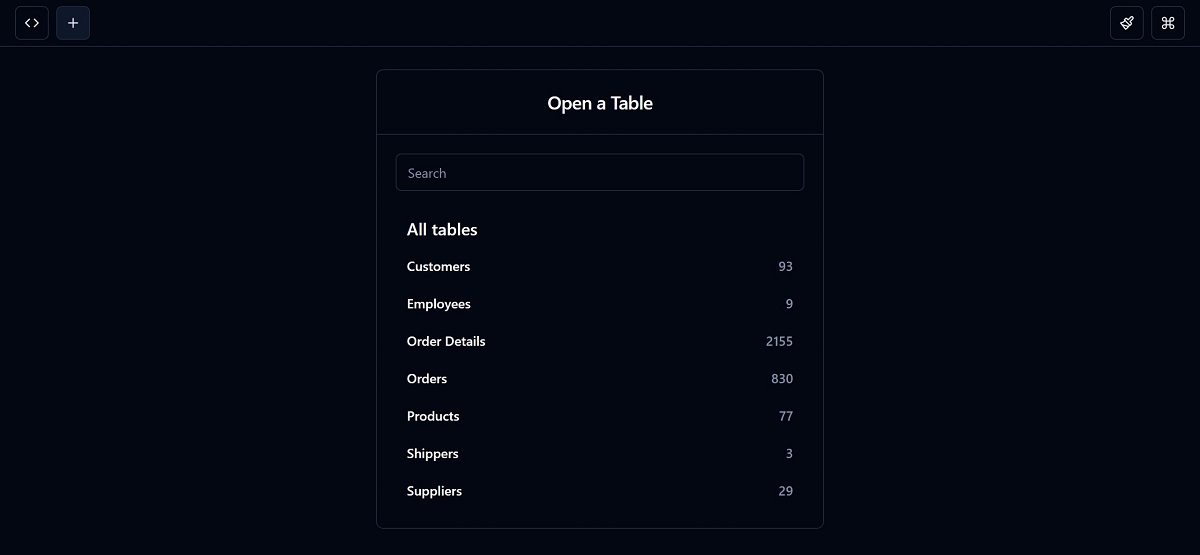
Check out a live example of Drizzle Studio here.
Once you go into one of the tables, you can:
- Look at the data,
- Add rows,
- Edit rows,
- Delete rows,
- Export your data to
.csvor.json, and - Perform custom SQL queries
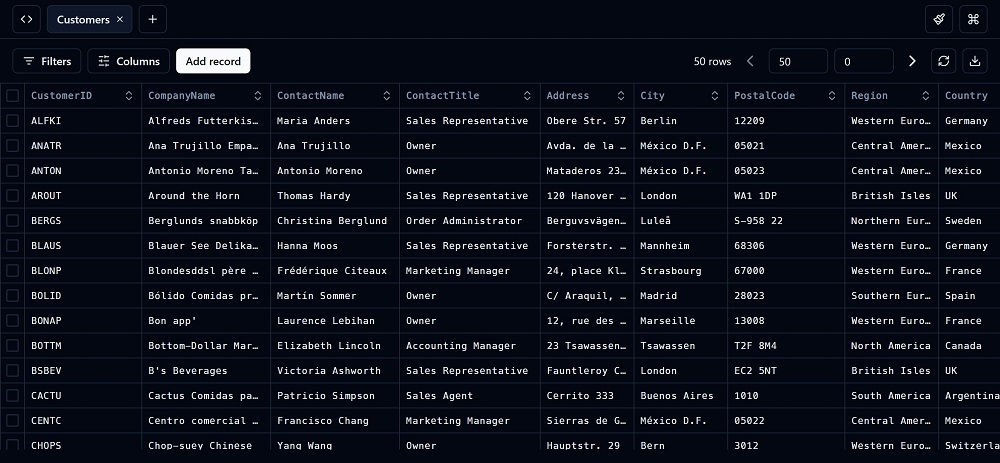
As you can tell, it’s a simple way to edit and create data without coding them yourself.
Conclusion
Drizzle is a fantastic way to connect your SvelteKit app to your database and get the benefits of typesafety and intellisense. We’ve seen that it’s a simple process, and if you know a bit of SQL, you won’t have any problem with the Drizzle syntax.
Given that Drizzle is so lightweight and can also run on the edge, it’s superior to some of the big players in the ORM space (ahem, 🤧 Prisma 🤧).
Given that SvelteKit has a flexible backend which handles Drizzle so simply, I highly recommend adding it to your next project, or even migrating from a current one. ❤️