The Guide to Svelte Runes
| Published: January 25, 2024
| Updated: January 30, 2024
Runes have been the flagship feature of the upcoming Svelte 5 release, set to drop early 2024. On the announcement day of Svelte 5, the Svelte team released their work-in-progress implementation of Runes, with some accounting of why they’re necessary.

So far, the implementation has had mixed reviews. Some people in the Svelte ecosystem think the more verbose syntax of runes defeats the purpose of using Svelte in the first place. Others appreciate having a more reliable source of truth when it comes to using reactivity beyond .svelte files. But we’ll get to that later…
No matter how you slice it, runes are a significant change to how we will develop apps in Svelte. So with that said, it’s a good idea to start getting familiar with the new concepts and syntax as we move onto the next chapter of the Svelte story.
In this article, we will:
- walk through all the additional syntax you’ll need to learn,
- outline instances where you will use runes,
- mention the now-obsolete keywords and patterns from Svelte 4, and
- talk a bit about what’s happening under the hood
So strap in, we’re going to rune-town. 🤩
The basic syntax
Before runes, you would typically declare a reactive variable like this:
let points = 0;Now with runes, this is how your write a reactive variable:
let points = $state(0);
Ok king, I hear ya. That ”state” keyword has really got some developer’s knickers in a knot.
And yes, it’s slightly more verbose than the elegant way we’ve gotten used to, however there’s a method to the madness.
If you want a quick answer for “why” runes have been introduced to Svelte, it’s simply more consistent and interopable throughout the different files and sections of your app.
Prior to runes, the behaviors inside .svelte components have been odd to say the least! So now we have runes that can be called in both .ts files and .svelte files, so you can shared behaviors (like reactivity) outside of .svelte files. This is particularly useful when creating writables stores in .ts files.
You can skip to read more reasons why runes are an important addition to Svelte, but let’s jump in an start using them first!
How can I start using Runes?
Runes are a feature coming with Svelte 5, which is still currently in it’s beta stage. Depending on how serious you are about using Runes right now, you have 2 options available to you:
- The Runes Playground, or the
- Creating a new project with Svelte 5 features (including runes)
If you want to learn about and play with all of the Svelte 5 features, you can check out the guide to Svelte 5. It’s more succinct on the topic of runes, but it encompasses all the other new featurs and breaking changes with v5.
The runes playground
The Svelte team have made an online playground available so the people can start playing with runes before incorporating them into their project.
The playground is the REPL you’ve probably seen around, but this one has runes functionality baked into the .svelte components.
You can visit the runes playground on the Svelte 5 preview site. Try porting some components from your current projects and go through the conversion process as we visit all different runes in this article.
Starting a new project with Svelte 5
At the moment, when you start a new project following the standard Svelte installation process, they give you the option to opt into Svelte 5 features, including runes.
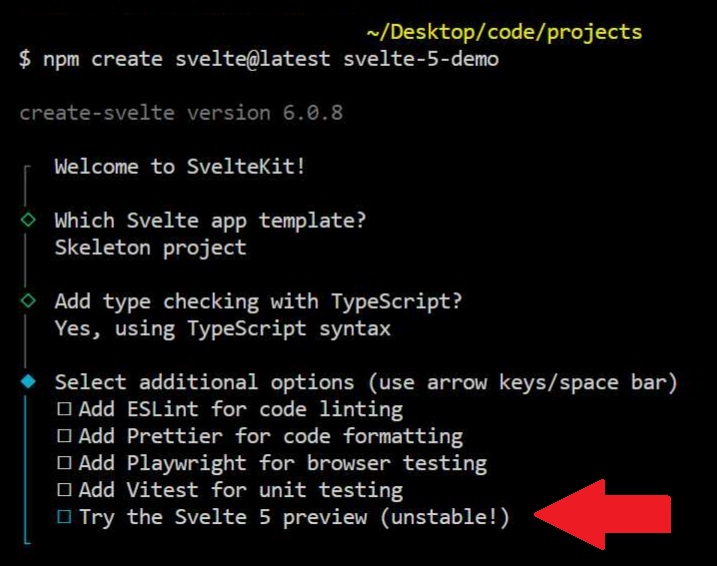
This will set the syntax to use runes (and other Svelte 5) features by default. As Svelte 5 is still in beta and the API’s are likely to change, it might not be a good idea to use this for mission-critical apps in production.
But if you’re happy to, then you can just start using runes in your new project. You can scope the rune-based compile either way by:
- Enforcing them on a component-by-component bases by opting in with a
<svelte:options>tag, or - Force the compiler to use runes project-wide in your
svelte.config.jsfile.
I you want to use either the old compile or the runes compiler in a single component, you can add this tag:
<!-- This can also be false if you want to use the Svelte 4 compiler/syntax -->
<svelte:options runes="{true}" /> //
Or you can force runes (or the old syntax) project wide by adding runes: true to your compilerOptions in your svelte.config.js file:
export default {
	compilerOptions: {
		runes: true // Which could also be false if you want to force the Svelte 4 compiler/syntax
	}
};
So now that you’re set up, lets look at all of the runes we have available to us! 👯♂️
All of the runes declaration types
That $state example we just used above is just the tip of the iceberg. There’s quite a bit to discuss when talking about runes, so let’s walk though all of the new declaration types, and when to use them.
The rune declarations are:
$state,$state.frozen,$derived,$props,$inspect,$effect,$effect.pre,$effect.active, and$effect.root,
You’ll likely use most of them regularly, so it’s worth taking the time to understand how each works. They’re roughly ordered by level of importance, from “must-knows” to “nice-to-knows”.
The $state rune
Use the $state rune declaration to make a reactive variable. You can do that in a .svelte <script> tag, or in any .ts file like this:
let points = $state(1);We’ve talked about this already because it’s the most simple and useful rune primitive.
Unlike the old way of declaring reactive variables, which can only be declared inside <script> tags in .svelte components, a $state rune can be declared in your .svelte components, and also your .ts files. This means you have no unexpected behaviors when sharing reactive variables between these files.
Another huge plus to this is that $state objects and arrays are reactive and can be mutated. For example:
<script>
	let purchaseValueInput = $state(0);
	let allPurchases = $state([22, 30, 18, 26]);
</script>

<input bind:value="{purchaseValueInput}" type="number" />

<button
	onclick={() => {
		allPurchases.push(purchaseValueInput);
	}}
>
	Add Purchase</button
>

<button
	onclick={() => {
		allPurchases.pop();
	}}
>
	Refund last purchase</button
>

<p>Total: ${allPurchases.join(' + $') || 0} = ${allPurchases.reduce((a, b) => a + b, 0)}</p>
And the result is a completely reactive array which we would treat as any normal Javascript array.

The $state.frozen rune
The $state.frozen rune is similar to the regular $state rune, however the value cannot be mutated, however it can be reassigned.
The state.frozen rune is similar to Reacts useState in that you can’t mutate the state, but when you use setState(), you just reassign a new value to it.
From our last example, this won’t work:
<script>
	// ... other variables
	let allPurchases = $state.frozen([22, 30, 18, 26]);
</script>

<!-- ❌ This will not work -->
<button
	onclick={() => {
		allPurchases.push(purchaseValueInput);
	}}
>
	Add Purchase</button
>

<button
	onclick={() => {
		allPurchases.pop();
	}}
>
	Refund last purchase</button
>
When we click either of the buttons, we’re attempting to mutate a $state.frozen rune directly, so we get this error:
Error: Cannot add property 0, object is not extensibleAnd nothing happens to the allPurchases rune.
Instead, if you wanted the same effect to work, you would assign it like this:
// ✅ This will work
<script>
	// ... other variables
	let allPurchases = $state.frozen([22, 30, 18, 26]);
</script>

<button onclick={() => allPurchases = [...allPurchases, purchaseValueInput]}>Add Purchase</button>
<button onclick={() => allPurchases = allPurchases.slice(0, allPurchases.length - 1)}>Refund last purchase</button>
The benefit of $state.frozen is that it improves performance, especially when dealing with large arrays or objects. This is because it doesn’t have to build out the small cost of having to make it reactive.
There’s also a case to be made that using $state.frozen is safer if you wanted to make sure the object/array you were declaring doesn’t mutate at any point. Kind of like using a const instead of a let in vanilla Javascript.
The $derived rune
The $derived rune is a reactively updating variable which is dependent on the result of some function.
The $derived rune will always be reactive to the changes of its dependencies.
For example, I want the $derived variable to be 10x the base value.
<script>
	let base = $state(1);
	let tenX = $derived(base * 10);
</script>

<input bind:value="{base}" />
<p>10x = {tenX}</p>
In this example, you have an input, and below it is the 10x value of it, which updates with the base value in the input:
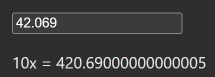
(╯‵□′)╯︵┻━┻ I promise, it works
The $derived value will also always be current, so you don’t need to worry about value mismatches when using the derived value in a function right after the dependency changes - your changes will be reflected immediately, and thus before the next executable runs.
It’s also worth noting that you can’t use state changes inside your derived functions - it’ll cause an infinite loop and Svelte will error at compilation.
The syntax change
The $derived rune has similar functionality to the old method of declaring a variable with $:. For example:
// ❌ Old derived method
let base = 5;
$: tenX = base * 10;
should now be:
// ✅ New derived method with runes
let base = $state(5)
let tenX: $derived(base * 10)
But the differences here is that $derived runes (new way), track dependencies at runtime, rather than at compile time. This means that you can now outsource your statements to a function, and the derived value will track without explicitly declaring the dependencies inside the derived statement.
You don’t need to explicitly declare dependencies in your $derived statement anymore
One of the caveats when dealing with the old $: syntax was that in order to maintain reactivity, the dependent variables had to be explicitly present in the derived statement (inside the brackets).
For example, in our 10x example above, if we were to go back to the old syntax and outsource our ”statement” to a separate function, like this:
<script>
	const getTenx = () => base * 10;
	let base = 1;
	$: tenX = getTenx();
</script>

<input bind:value="{base}" />
<p>10x = {tenX}</p>
Then the derived tenX would not be reactive to the base variable, because all it’s pointing to is a function. Whilst the return value of the function might change, the function itself won’t.
As mentioned earlier, this is because dependencies were tracked at compile time, and now they’re tracked at runtime. So now we can have our dependencies tracked from within a function, like this:
<script>
	const getTenX = () => base * 10;
	let base = $state(1);
	let tenX = $derived(getTenX());
</script>

<input bind:value="{base}" />
<p>10x = {tenX}</p>
And the $derived value reacts as you expect it would!
This is particularly helpful when you have more complex functions with if statements. As with the old way, you’d have to run a function every time a value changes, and specifically update a variable within that the function.
Reactive derived variables now work better with Typescript
In Svelte v4, it was all well and good to create a reactive variable with the $: syntax, however if you also wanted to assign a type to it, your only option was to assert it with an as keyword.
For example:
<!-- ❌ Incorrect syntax -->
$: division: number | boolean = height > 150 ? height : false;
<!-- ✅ Correct syntax but not as typesafe -->
$: division = (height > 150 ? height : false) as number | boolean;For whatever reason you couldn’t infer a type for the reactive variable, asserting it was the only option.
Now with runes, it’s native:
let division: number | boolean = $derived(height > 150 ? height : false);Now let’s look at the new runes way to accept props in a .svelte component.
The $props rune
The $props rune is the new way to accept props into a .svelte component.
Instead of using export let, you can now destructure them using a $props call.
For example, instead of declaring component props like this:
// ❌ The Old Way

export let propA;
export let propB;
export let propC;
You now declare them like this:
// ✅ The New Way

let { propA, propB, propC } = $props();
Or if your using typescript, you would declare your props like this:
// ✅ The New Way with typescript

type Props = {
	propA: string;
	propB: number;
	propC?: boolean;
};

let { propA, propB, propC = true } = $props<Props>(); // For propC, the default value is true when no value is passed
The change isn’t extraordinary, however the support for typescript is slightly improved. I particularly love the typescript users can use the optional operator (?) again for prop types, instead of having to write | undefined.
The new $props rune can also help with code readability as it keeps all props together in 1 line of code, which is something many other Javascript frameworks do. The difference is that instead of seeing your props explicitly stated on their own line with the associated type, you’ll have to refer to where the type is declared.
You can continue using:
export const, andexport functionin the same way you always have, however with the$propsrune, theexport letkeyword gets the chop.
For advanced users and library builders, the new $props rune also replaces the $$props and $$restProps keywords. This would be replaced by rest syntax, which you can used like this:
let { propA, propB, propC, ...rest } = $props();where:
$propscan will replace$$props, and- The rest syntax
...restcan cover the$$restProps
It doesn’t matter what you write in place of rest, by the way - as long as you prefix it with ..., the compiler knows you’re declaring the rest of the props.
The $inspect rune
The $inspect rune is available in development environments, which triggers a console.log of its arguments when any of them change.
So, if you wanted to log changes to the state variables, points and isGameOver, you could declare this:
<script>
	let points = $state(0);
	let isGameOver = $state(false);

	$inspect(points, isGameOver); // will console.log when `points` or `isGameOver` change
</script>
So, this will do 2 things:
- When the component is initialized,
$inspectwill log an"init"string, followed by the initialized value of the arguments,points, andisGameOver - Then, if either of the
pointsorisGameOvervalues change, the$inspectrune will log an"update"string, followed by the updated values of both arguments at the time it is called.
So, on page load, we get this log:
"init"
0
false
and then if I click a button to increment the points value, we get this log:
"update"
1
false
And then if I click the game to be over, it logs this:
"update"
1
true
Pretty straightforward - it’s basically a reactive statement with a console.log attached to it. If you wanted to emulate a similar pattern in Svelte 4, you’d do something like for the same effect:
let points = 0;
let isGameOver = false;

$: points | isGameOver, console.log(points, isGameOver);
However, you don’t get the in-built ability to distinguish between init and update without building out a bunch of other code to handle this.
Let’s double-click into the init and update distinction a little more, as it’s part of the with property which you can extend the $inspect rune with.
The with property in the $inspect rune
As we just discussed, the $inspect default behavior is to log its arguments when they are initialized, or when they change. You can modify this default behavior however, to anything you want, using the with property.
let points = $state(0);

$inspect(points).with((type, count) => {
	console.log('Number of times triggered: ', count);
	if (type === 'init') {
		console.log('We are only just getting started');
	}
});
When you append with() to your normal $inspect rune, you can extend out the functionality of it, and the callback arguments provided to you are:
type, andcount
Where type can be either "init" or "update" - which we discussed before as it logs with the default behavior.
And the count callback argument is the amount of times it has been triggered in its lifecycle.
Use the $inspect run for debugging
As the $inspect rune is only available in development environments, it’s best explained by showing how it can be used with the debugger:
<script>
	let points = $state(0);

	$inspect(points).with((type, count) => {
		if (type === 'update') {
			debugger;
		}
	});
</script>

<button onclick={() => points++}>Add Point</button>
Which would open up the debugger every time a point is added. Make sure you have your browser DevTools panel open for this to work.
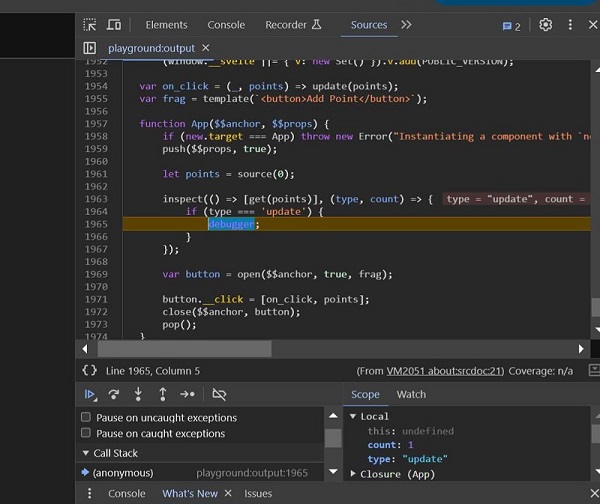
With the debugger panel open, you can go through the source code and step over the processes to better understand what’s making the unexpected changes you see in your application. If you aren’t familiar with the debugger panel, your debugging skills will level up by learning how to use it.
Another shortcut available to diagnose where changes are coming from with the $inspect rune is to use:
$inspect(variable).with(console.trace);Which gives an output that looks like this:
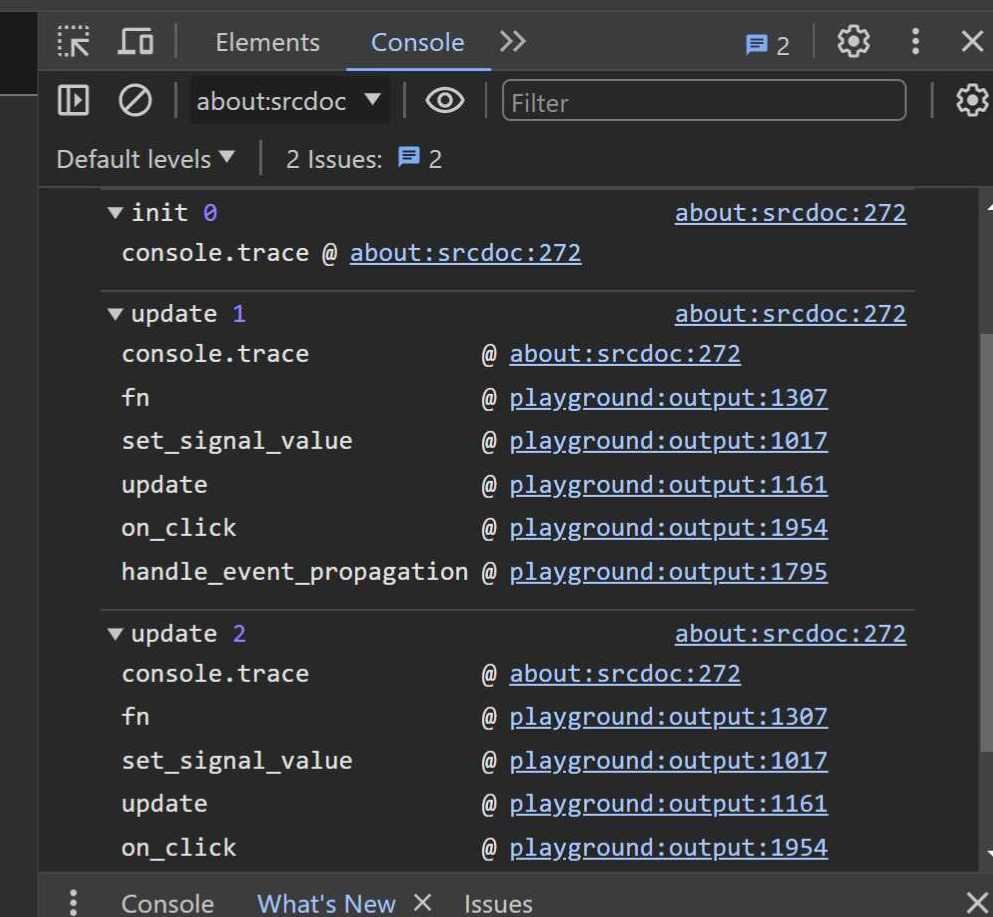
Which logs the type and the argument value on the top line, followed by the stack trace leading changes that occur leading up to the log from the bottom up. This way you can see if there’s any rogue function calls happening that you didn’t expect.
This changes so far have mostly been received well, but now we’re moving into territory which has rattled some Svelte developers.
Warning: React-like syntax incoming 😏
The $effect rune
The $effect declaration runs a side effect when some dependent variable changes.
This is fairly loaded and can be used for many different purposes, however if you’ve used React before, it’s very similar to the useEffect(). You know, that hook that everyone loves. 😅
In it’s basic form, it looks like this:
$effect(() => {
	console.log({ receivables, payables });

	return () => {
		console.log('cleanup');
	};
});
What’s happening here is:
- when the component is mounted, anything above the
returnstatement gets run, so in this case, the value ofreceivablesandpayablesis logged, - every time the value of either the
receivablesorpayableschange, the part above thereturnstatement runs, so in this case it will log the updated values of these values - when the component is removed from the DOM, the part inside the return statement is run, so in this case it logs “cleanup” when the component is destroyed, and also
- every time this effect has to re-run, the part inside the
returnstatement is run before it runs the top section.
So if we had this component:
<script>
	let receivables = $state(0);
	let payables = $state(10);

	$effect(() => {
		console.log({ receivables, payables });

		return () => {
			console.log('cleanup');
		};
	});
</script>

<label>     Receivables     <input bind:value="{receivables}" type="number" /> </label>

<label>     Payables     <input bind:value="{payables}" type="number" /> </label>
The logs on page load are:
{ receivables: 0, payables: 10 }This is because the ‘section above return’ runs when the component mounts.
And with every number you press in either of the inputs, this is logged to the console:
"cleanup"
{ receivables: 0, payables: 100 }
Remember, the return statement is run immediately before every $effect re-run. And because changing either of the dependencies inside the $effect triggers a re-run, the 'cleanup' string is logged.
Note: the return statement in any
$effectrune is optional.
You can even just place a variable in the $effect function without any direction, just to add it to the dependency list.
For example, if we want to log “Things are changing” every time one of our variables change, but we don’t necessarily want to do anything with it in our $effect rune, we can place it in there like this:
let numbers: $state([])
let letters: $state('')

$effect(() => {
	numbers;
	letters;
	console.log("Things are changing");
})
Notice we’ve just placed them in there as dependencies, but no instruction is running using the numbers or letters variables.
What the $effect rune is for
You can use the $effect rune to:
- Do something
onMount(), - Do something
afterUpdate(), - Do something
onDestroy(), and - Perform some action (e.g. fetch call or log) when a variable (an
$effectdependency) changes.
Previously with Svelte, you would perform such a task like this:
$: dependency, effectFunction();Which meant that every time dependency changed, the effectFunction would run. And you could stack them, like this:
$: dependency1, effectFunction();
$: dependency2, effectFunction();
So, love it or hate it, $effect can make your codebase more concise.
The argument of introducing the footguns that React has with useEffect is not entirely valid. This is because useEffect is required for making derived values, and state values aren’t actually reactive like they are in Svelte. So many of the bad experiences you’ve had with useEffect probably won’t be relevant to Svelte with the $effect rune.
It’s also worth nothing that the section above the return statements runs after the DOM has been updated.
So, if you need to access to an effect before the DOM updates, you’re best using the $effect.pre rune.
The $effect.pre rune
The $effect.pre rune, is a regular $effect rune, however it addresses the edge case where you need to run code before the DOM updates.
So in a regular $effect rune, the code runs after the DOM updates.
If you’re coming from old Svelte:
- The
$effectrune replaces theafterUpdatemethod (which is deprecated in Svelte 5), and - The
$effect.prereplaces thebeforeUpdatemethod (which is also deprecated in Svelte 5).
Given how much of an edge case this rune addresses, the best example I could give is fairly verbose. Therefore this example is from the Svelte 5 preview documentation.
<script>
	import { tick } from 'svelte';

	let div;
	let messages = [];

	$effect.pre(() => {
		if (!div) return; // not yet mounted
		// reference `messages` so that this code re-runs whenever it changes
		messages; // autoscroll when new messages are added
		if (div.offsetHeight + div.scrollTop > div.scrollHeight - 20) {
			tick().then(() => {
				div.scrollTo(0, div.scrollHeight);
			});
		}
	});
</script>

<div bind:this={div}>
	{#each messages as message}
		<p>{message}</p>
	{/each}
</div>
As we need the code to run before the DOM is updated to provide the correct user experience we want, we’ve used the $effect.pre, in tandem with the tick utility.
The $effect.pre rune, prepares for the DOM to update, and then if the condition is met, the tick waits for the DOM to update with the new messages, and then scrolls to the bottom so that the user sees the latest message.
Notice that in this example, messages is just placed in the function without any instruction, just so that we can include it as a dependency.
Now lets move onto another edge case rune that might take a little more brain power to understand.
The $effect.active rune
The $effect.active rune tells you whether some piece of code is in an active effect.
Where $effect.active() returns true is where your code is in an active effect, which lets us determine whether there are potential memory leaks, and can be helpful for debugging.
It also allows us to read values without creating subscriptions or memory leaks.
For example, in your .svelte component, you could have:
<script>
	console.log('This will show false', $effect.active());

	$effect(() => {
		console.log('This will show true', $effect.active());
	});
</script>

<p>This will show true: {$effect.active()}</p>
In the first console.log() where it returns false, this is because the $effect.active() is running during the component setup, and therefore there’s no active effect being run at the time this line of code runs.
For obvious reasons, the second instance we call $effect.active returns true, because it is explicitly inside an $effect rune, so we can clearly visualize that it’s being called within an active effect.
The least obvious instance is when calling $effect.active() inside your markup and have it printing true. This may seem counter-intuitive as you’d assume it’s not part of an effect, however because it’s in your template, you can subscribe to values in your markup, and therefore it’s true.
Now we can look at our final rune.
Note: This one is also fairly advanced. 🤓
The $effect.root rune
The $effect.root rune is used to create nested effects that you want to control manually, and doesn’t clean up automatically.
Given the these are nested effects, $effect.root also differs from the normal $effect rune in that you can create these effects outside of the component initialization stage.
For example, we might want to turn effects on or off at different stages, so we could do something like this:
<script>
	let points = $state(0);

	const cleanup = $effect.root(() => {
		$effect(() => {
			console.log(points);
		});

		return () => {
			console.log('Clean up the effect root');
		};
	});
</script>

<button onclick={() => cleanup()}>Cleanup</button>
So, by clicking the Cleanup button, we manually get to pick the the effect is cleaned up.
And that’s all of the runes covered! 🥳
So know we know all of these changes are here, it’s important to know ”why?” from a high level.
Why do we need runes?
There’s a number of reasons why runes are important. Beyond the arguable fact that it makes your code easier and cleaner to write, the main benefits come from:
- aligned behavior between
.sveltecomponents and.js/.tsfiles, and - performance improvements using signals under the hood
So let’s look into these aspects a bit further.
Aligned behavior between .svelte components and .js files
If you’ve been developing in Svelte long enough, you would’ve dealt with some of the reactivity quirks. In simple applications, or single-component demo’s, the current reactivity (and associated syntax) is straightforward, and very compelling.
The reactivity also works perfectly 95% of the time, however occasionally there’s issues when you’re handling a let variable in a .svelte file, and it’s either being passed from, or to a .ts file. You see, these different files handle the let keyword differently:
- in the
.sveltefile, the variable is reactive, however, - in the
.tsfile, it is not reactive.
A situation like this leads to inconsistencies where variables aren’t reactive in the .ts file, however they ought to be, as something in a .svelte components is dependent on it.
To solve this (and provide some additional state management), Svelte stores would be employed, which would have looked something like this:
src/utils/store.ts
import { writable } from 'svelte/store';

export function createCounter() {
	const { subscribe, update } = writable(0);

	return {
		subscribe,
		increment: () => update((n) => n + 1)
	};
}
However, now because the $state rune is cross-component and reactive, we can make the store like this instead:
src/utils/store.ts
export function createCounter() {
	let count = $state(0);

	return {
		get count() {
			return count;
		},
		increment: () => (count += 1)
	};
}
As the $state keyword works anywhere in your app, you’d be generally better off declaring reactive variables with this, as you can use it in both your .svelte components, and .ts files, with identical expected behaviors.
With runes, most of the reactivity uncertainty is removed, and we have a better grip on the reactivity offered between files.
Runes uses Signals
Under the hood, runes use signals, which isn’t something you’ll need to be familiar with when you’re coding, however it means your application will be much faster.
From a high level, an example where signals improve reactivity is that if you wanted to change one value inside a large list, the other values in the list would not need to be invalidated. In Svelte today, this is not the case.
Conclusion
Congratulations if you studiously made it through all of the runes! Most of them were pretty straightforward, but admittedly things start to get a bit hairy when you go into the depths of the $effect runes.
Alas, this is the future of Svelte. Most of the legacy syntax will remain throughout the rollout of Svelte 5, but it’s a losing battle hanging on to the ways of the past.
As mentioned earlier, runes and a lot of the other Svelte 5 features are a work in progress, so it’s likely we’ll see changes both under that hood, and in the rune API’s.
So until next time, hop into the playground, start up a new Svelte 5 project and get jiggy with runes. ❤️