Svelte 5 Is Coming
| Published: January 30, 2024
| Updated: February 23, 2024
The word is out that Svelte 5 will be released early 2024, and we’re starting to see glimpses of what’s to come.
It’s a complete rewrite of the Svelte framework, and the hype around it makes it one of the most anticipated web-dev releases of 2024.

By following the Svelte repo on Github and the statements made by the founder, Rich Harris, we can expect:
- many syntax overhauls,
- a bunch of new features, and
- massively improved performance
In this article, we’ll walk through some of the main changes we’ve seen so far in the beta, and inform you how to best prepare for when Svelte 5 officially arrives.
Is Svelte 5 Ready yet?
Svelte 5 is not ready yet, however, an early 2024 release is expected.
To see some of the expected features coming up, check out the SvelteKit Roadmap, which looks into the milestones on the GitHub Page. You can also check the Test Status page to monitor Svelte 5’s test status across 4,000+ tests.
How to get the Svelte 5 Beta
If you don’t want to go through the process of scaffolding a new project on your computer, you can use the Svelte 5 playground to build simple components and test out the new features.
However, if you want to do it properly and create a project with the Svelte 5 preview on your computer, you can get started by entering the following command in your terminal:
npm create svelte@latest svelte-5-test-appThen you’ll be prompted to scaffold the project with the latest Svelte 5 Beta.
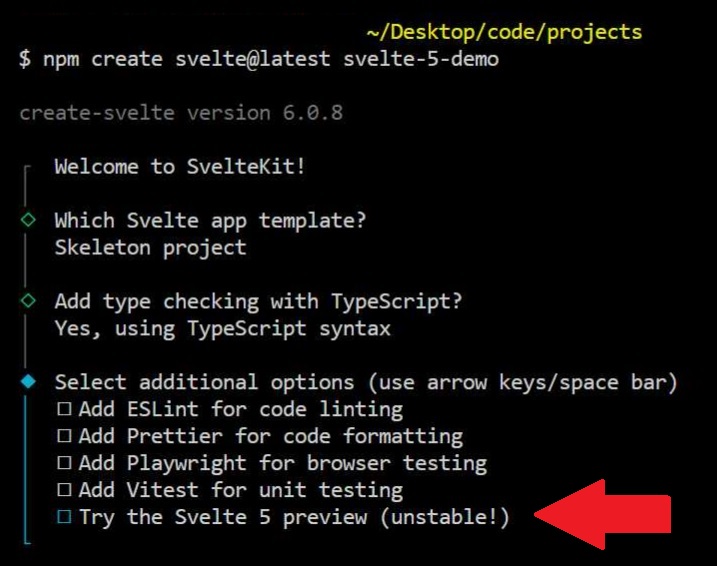
If you select this option and start writing components with the syntax you’re used to from Svelte 4, you’ll be getting errors popping up all over the place.
Luckily, the working changes in Svelte 5 are intuitive for the first part, and open up opportunities to create more reliable apps without the need for ’hacks’ to get around the quirks of earlier Svelte versions.
Current features in the Svelte 5 Beta
When you install the Svelte 5 beta, you’ll now have access to the following features:
There are also some other dev-experience improvements with Svelte 5, like Typescript in your markup.
Let’s get right to it with runes.
Runes
Runes was the first big feature announced for Svelte 5, and for good reason. It’s a big change to how you do basic variable declarations and effect management in your .svelte components.
Initially runes caught some negative feedback, as some of the API bears resemblance to React, however as more developers start playing with the new approach, the overall sentiment feels more positive.
The main proposition runes bring to the table is more fine-grained reactivity. To be more precise, runes have these properties:
- a suite of new syntax for creating reactive variables,
- runtime reactivity,
- aligned behavior between
.sveltefiles and.js/.tsfiles, - reactive objects and arrays,
- making a number of keywords and methods from Svelte 4 obsolete 👀
In this article we’ll touch only touch on a couple of the changes, so I encourage you to read the Guide to Runes, which look at all of the runes and how they’ll change your workflow moving forward.
Basic Syntax Changes with Runes
To write a reactive variable with Svelte 4, you would declare it as this:
// ❌ Old way

let age = 20;
With Runes, you would declare the same variable like this:
// ✅ New way with runes

let age = $state(20);
You can see why there was an immediate recoil from some of the Svelte community. 😅
I promise there’s a case for this more verbose syntax, but we’ll get to that in a bit.
There are 9 runes in the Svelte 5 beta:
$state,$state.frozen,$derived,$props,$inspect,$effect,$effect.pre,$effect.active, and$effect.root,
The first 6 mentioned are the most useful and important to know when using Svelte 5. So now we’ll walk through each of the runes, with a summary of their purpose and a code block to demonstrate their usage.
Before we start going into each of the runes, make sure you’ve opted in to use them in a Svelte 5 beta project, or use the Svelte 5 playground with runes on by default.
$state rune
The $state rune declares a new reactive variable which can be used beyond the <script> tag in .svelte components.
✔ New Way with $state
let name = $state('Jack')❌ Old Way:
let name = "Jack"$state.frozen rune
The $state.frozen rune is the same as the $state rune, however the variable cannot be mutated - it can only be reassigned.
let students = $state.frozen(['Jack', 'Sam', 'Mary']);

// ❌ This won't work as you are attempting to mutate the value
students.push('Max');

// ✅ Reassign the value instead:
students = [...students, studentInput];
If you wish to have a reactive variable which can be mutated, use the $state rune instead:
let students = $state(['Jack', 'Sam', 'Mary']);

// ✅ This will work as $state runes can be mutated
students.push('Max');$derived rune
The $derived rune allows you to create a reactive variable who’s value is dependent on some other variable.
✔ New Way with $derived
let area = $derived(width * height)❌ Old Way:
$: area = width * height;$props rune
The $props rune allows you to accept parameters into a .svelte component:
✔ New Way with $props
type Props = {
	name: string;
	string;
	number;
}

let {name, email, age} = $props<Props>()
❌ Old Way:
export let name: string; export let email: string; export let age: number;$inspect rune
The $inspect rune will console.log a value every time it changes, and will also provide context as to whether it’s the initialized value, or whether it’s being updated:
✔ New Way with $inspect
let points = $state(0) $inspect(points)❌ Old Way:
let points = 0 $: points, console.log(points)It’s worth noting that the $inspect rune will only run in the dev environment.
$effect rune
The $effect rune accepts an anonymous function which will run each time one of the variables within the anonymous function changes, and also when the component is mounted to the DOM.
The $effect rune looks like this:
$effect(() => {
    // Do something
    return {
	    // Do something with cleanup
    }
})Yep, this is quite a bit like the useEffect hook we all know and love from React! 🤦♂️
This rune will replace a list of different functions and features in Svelte 4, including:
- Creating an effect function with with the
$:operator , - onMount,
- onDestroy, and
- afterUpdate
Creating an effect to do an action when a variable changes
✔ Call an effect when a variable changes with $effect
<script>
	let name = $state('Jack');

	$effect(() => {
		alert('New Name is ' + name);
	});
</script>
As name is inside the $effect, it is added to the list of dependencies for the effect, such that when any of them change, the $effect is run.
❌ Old Way:
<script>
	let name = 'Jack';

	$: name, alert('New Name is ' + name);
</script>
A new syntax for onMount
✔ Calling a function when the component is mounted to the DOM with $effect
<script>
	$effect(() => {
		alert('The component is mounted');
	});
</script>
❌ Old Way:
<script>
	import { onMount } from 'svelte';
	onMount(() => {
		alert('The component is mounted');
	});
</script>A new syntax for onDestroy
✔ Calling a function when the component is destroyed from the DOM with $effect
<script>
    $effect(() => {
        return {
	        alert("The component is destroyed");
        }
    })
</script>
Notice that when the component is destroyed, the contents inside the return of the $effect rune are executed.
❌ Old Way:
<script>
	import { onDestroy } from 'svelte';
	onDestroy(() => {
		alert('The component is destroyed');
	});
</script>A new syntax for afterUpdate
✔ Call an effect when a variable changes with $effect
<script>
	let name = $state('Jack');

	$effect(() => {
		alert('The component has updated');
	});
</script>
As the $effect runs after the DOM has been updated, it’s effectively an afterUpdate() call.
❌ Old Way:
<script>
	import { afterUpdate } from 'svelte';
	afterUpdate(() => {
		alert('The component is mounted');
	});
</script>
The afterUpdate() and beforeUpdate() functions will be deprecated in Svelte 5.
If you wish to learn about how to perform beforeUpdate with the new rune system, you can do that with the $effect.pre rune.
A short word on runes
Given that the runes we’ve just covered will be the only ones you need to know 95% of the time, we’ll now move onto how you can opt into using runes. However, if you wish to dig a bit deeper, the guide to runes goes into depth for all of the runes.
The runes we didn’t cover in this article are:
Opting in to use Runes with the Svelte 5 Beta
If you’re using the Svelte 5 beta, you’ll have to specifically ’opt-in’ to use runes, which means you will forgo the use of the reactive variables that you had in prior Svelte versions.
The best part is, you can opt-in at the project level, or just at the component level. So if you already have a project, you won’t have to update everything in your project at once. Your old components will still work and the migration process can be gradual - if you even want to move to runes at all!
How to Opt Into Runes
You can scope opting-in to runes at the component level by adding this tag anywhere in your .svelte file:
<svelte:options runes={true} />Or,
You can do across your whole project level in your svelte.config.ts file, by adding runes: true to your compilerOptions:
export default {
	compilerOptions: {
		runes: true
	}
};
Okay, we’re done with runes now. 🥳
With runes being based more on the script side of things, it’s time to venture down to our markup.
The next discussion point is a markup feature which allows us to write cleaner code and improve developer experience when building large and complex UI’s.
So, let’s move on to Snippets!
Snippets
Snippets are designed to make you stop repeating code, by providing an interface for making reusable markup blocks, or rather - snippets!
Isn’t that exactly what a component is?
Well, almost. But not quite!
It’s more like a <slot /> that you would’ve use in Svelte 4. The difference is that with snippets, you can assign arguments to them, and they are more flexible.
Let’s say you have a component that looks like this:
+page.svelte
{#each profiles as profile}
	{#if profile.approved && profile.id}
		<a href={`/profile/${profile.id}`}>
			<div class="card">
				<div class="flex">
					<img src={profile.image} />
					<p>Name: {profile.name}</p>
				</div>
				<p>{profile.username}</p>
			</div>
		</a>
	{:else}
		<div class="card">
			<div class="flex">
				<img src={profile.image} />
				<p>Name: {profile.name}</p>
			</div>
			<p>{profile.username}</p>
		</div>
	{/if}
{/each}
We can see a repeatable code block for both conditions:
<div class="card">
	<div class="flex">
		<img src={profile.image} />
		<p>Name: {profile.name}</p>
	</div>
	<p>{profile.username}</p>
</div>
So, we can make that code block a snippet like this:
{#snippet card(profile)}
    <div class="card">
        <div class="flex">
            <img src={profile.image}>
            <p>Name: {profile.name}</p>
        </div>
        <p>{profile.username}</p>
    </div>
{/snippet}
And then use it anywhere in our component like this:
{@render card(profile)}So the full example would look like this:
{#snippet card(profile)}
    <div class="card">
        <div class="flex">
            <img src={profile.image}>
            <p>Name: {profile.name}</p>
        </div>
        <p>{profile.username}</p>
    </div>
{/snippet}

{#each profiles as profile}
    {#if profile.approved && profile.id}
        <a href={`/profile/${profile.id}`}>
            {@render card(profile)}
        </a>
    {:else}
        {@render card(profile)}
    {/if}
{/each}Passing Snippets to Components
You can pass snippets to component in 2 ways:
But first, lets look at the component that will accept the snippet into it:
List.svelte
<script lang='ts'>
    let { data, listHead, listRow } = $props();
</script>

<div>
    {#if listHead}
        {@render listHead()}
    {/if}
    {#if listRow}
        <ul>
            {#each data as item}
                <li>{@render listRow(item)}</li>
            {/each}
        </ul>
    {/if}
</div>
Now let’s look at how we could pass a snippet into this component.
Passing a snippet to a component as a prop
FriendsList.svelte
<script lang='ts'>
    type Friend = {
        id: string | null;
        name: string;
        username: string;
        image: string;
        approved: boolean;
    };

    const friends: Friend[] = [
        {
            id: '1',
            name: 'Ben Beaker',
            username: 'beakerman',
            image: 'https://fakeimage.com/beakerman',
            approved: true,
        },
        {
            id: null,
            name: 'Mary Fisher',
            username: 'fish',
            image: 'https://fakeimage.com/fish',
            approved: false,
        }
    ];
</script>

{#snippet listHead()}
    <h1>This is my friends list</h1>
{/snippet}

{#snippet listRow(profile)}
    <div class="card">
        <div class="flex">
            <img src={profile.image}>
            <p>Name: {profile.name}</p>
        </div>
        <p>{profile.username}</p>
    </div>
{/snippet}

<List data={friends} {listHead} {listRow} />
Passing a snippet to a component as a child
As was the case with slot’s, if a component had a <slot /> in the markup somewhere, we could add markup between the components tags.
<List data={friends}>
    {#snippet listHead()}
        <h1>This is my friends list</h1>
    {/snippet}

    {#snippet listRow(profile)}
        <div class="card">
            <div class="flex">
                <img src={profile.image}>
                <p>Name: {profile.name}</p>
            </div>
            <p>{profile.username}</p>
        </div>
    {/snippet}
</List>
Because snippets have names, they are equivalent to a named slot in Svelte 4. And therefore no changes need to happen for the component accepting the snippet props:
let {(data, listHead, listRow)} = $props();That’s enough to get you by with snippets. Remember, <slot /> will be deprecated in Svelte 5, so it’s important to understand snippets!
If you want to learn more, check out the guide to snippets which goes into more detail about how to use them and provides some additional examples, including porting a real-life Aceternity UI component from React to Svelte using snippets.
Now we’ve covered the major breaking changes to Svelte 5, we can move onto the subtle changes and improvements.
Changes to Event Handlers
In Svelte 5, the element event listeners will move from on: directives, to being their own own property.
So on:click becomes onclick, and on:mouseenter becomes onmouseenter… etc.
There’s some benefits, and consequences as a result of this change.
A few benefits include:
- Guaranteeing typesafety,
- Improving readability,
- Ability to spread event handlers (
i.e. <button {...props} />)
Another emergent property of removing directives is that if you have generically named functions (e.g. function onclick()) to do something when process these events, you can now use the shorthand prop declaration when adding it to an element.
For example, if you had this function in your component:
<script>
	function onclick() {
		console.log('Clicked');
	}
</script>
❌ This old way of triggering the onclick function above would be:
<button on:click={onclick}>Click Me</button>✅ The new way:
<button {onclick}>Click Me</button>Or if your function was called onMouseClick, then you would have:
<button onclick={onMouseClick}>Click Me</button>Just remember, there’s no on: directives on elements anymore - they’ve become regular properties without the colon (:).
Event Modifiers are now gone
Now that the element directives are gone on the elements, we don’t have access to the event modifiers, which were effectively shortcuts for common event modifications.
For example, in Svelte 4 you could turn this:
<!-- ✅ You have to move forward like this -->
<button
	on:click={(event) => {
		event.preventDefault(); // Do Something
	}}>Click Me</button
>
Into this:
<!-- ❌ You can't do this anymore -->
<button
	on:click|preventDefault={(event) => {
		// Do Something
	}}>Click Me</button
>
which you can’t do anymore.
This applies to all event modifiers, which include (but are not limited to):
stopPropagation(),capture(),once(),self(), etc.
Duplicate event handlers on elements are not possible anymore
Previously in Svelte 4 you could attach multiple duplicate events to an element.
For example, you could have 2 on:click directives on a single element, which would look like this:
<!-- ❌ Don't do this anymore -->

<button on:click={functionOne} on:click={functionTwo}>Click Me</button>
But now in Svelte 5, we have to move this into the 1 property, which you can do by creating a function and then calling functionOne and functionTwo inside that function:
<!-- ✅ Do this instead -->

<button
	onclick={(event) => {
		functionOne(event);
		functionTwo(event);
	}}>Click Me</button
>
No more createEventDispatcher
In Svelte 5, the createEventDispatcher function is being deprecated, in favor of accepting callback props.
So now in a child component, you can set the $props to take in a callback function.
Then instead of the createEventDispatcher which would fire off a name and detail when something happens in the <Child /> component, it just calls the passed in callback function assigned to it.
For example:
<script lang="ts">
	let { add, subtract } = $props();
</script>

<button onclick={add}>Add</button>
<button onclick={subtract}>Subtract</button>
And in the parent component:
<script lang="ts">
	let number = $state(0);
</script>

<Child add={() => number++} subtract={() => number--} />
This is how you should use use events from a child to its parent.
These are all the major changes done to the event handlers, so now let’s look at some functions that were introduced to Svelte 5.
The untrack function
The untrack function is used to escape a variable from being used as a dependency in our #effect or #derived runes.
For example, if we have the following #effect rune:
<script>
	import { untrack } from 'svelte';

	let name = $state('Jack');
	let age = $state(30); // ❌ age is now in the $effect dependency list when it shouldn't be

	$effect(() => {
		console.log("We're talking about a new person");
		console.log('Name: ', name);
		console.log('Age: ', age);
	});
</script>
The problem here is that every time age changes, we will log We're talking about a new person, which is untrue if the age changes.
What we want is the ability to change the age value, but also log the name and age when the person is different, i.e. name changes.
So we would untrack the age variable:
<!-- ✅ Remove age from the $effect dependency list like this -->

$effect(() => {
    console.log("We're talking about a new person")
    console.log('Name: ', name)
    console.log('Age: ', untrack(() => age))
})
So that now when name changes, the $effect is run, but if age changes, the $effect doesn’t get run.
Or if you wanted to use this in a $derived rune, you’d use it like this:
let totalOwing = $derived(latestPurchaseTier * untrack(() => rate))You’d use this if you wanted to didn’t want the $derived value to respond to changes in one of your dependencies. So, if it changes, it doesn’t effect the $derived value, however if others change (that are not untracked), the $derived value will change.
So in the example above , we only want to apply the rate at the time the latestPurchaseTier changes. So we can move the rate around all we want, but it will only affect totalOwing at the timestamp when the latestPurchaseTier changes, so we use untrack() on the rate.
The unstate function
For objects and arrays made with $state, the unstate function will return the plain value of the object/array without its reactivity. This means that if you were to log it, you would get the actual value you want, rather than a Proxy(Object).
For example, if you had this:
<script>
	import { unstate } from 'svelte';

	let person = $state({ name: 'Jack', age: 10 });

	$effect(() => {
		// ❌ Will log Proxy(Object)
		console.log(person);
	});
</script>

<input bind:value={person.name} />
<input bind:value={person.age} type="number" />
When you want to log the person, you won’t get the actual value of the object, but rather a Proxy(Object) with the value inside it.
But in the $effect, if we changed:
console.log(person) // Proxy(Object)to:
console.log(unstate(person)) // {name: 'Jack', age: 10}It will now log the person object value: { name: 'Jack', age: 10 }.
You would typically use this for when you can’t pass a ProxyObject into a function or API, such as using a library.
So now you know the 2 additional functions in Svelte 5 which allow us to handle some of the edge cases caused by runes.
Now we need to talk about something near and dear to my heart: It’s a solution to the problem that made me give up on Svelte in the early days before committing.
Svelte now crushes it with typescript.
You can now use Typescript in your Svelte markup
With the Svelte 5 preview, we can use typescript syntax everywhere, including .svelte components outside of the <script> tags.
In my article about Svelte {#each} blocks, I discussed in depth about Svelte’s inability to have typescript syntax inside of the Svelte markup.
In the article, I cited a common example where the lack of typescript in Svelte markup meant we had to do some crazy and unsafe workarounds to make a code block work.
We can now use the as type assertion keyword, so a code block like this will work:
<script lang="ts">
    let { numberArray } = $props<{numberArray: (number | undefined)[]}>()
</script>

{#each numberArray.filter((element) => Boolean(element)) as item}
    <p>{Math.floor(item as number)}</p> <!-- ✔️ "as number" now compiles -->
{/each}
However, in Svelte 4 and earlier, you have to initialize an entirely new reactive variable and assert it inside the <script> tags:
<script lang="ts">
	export let numberArray: (number | undefined)[]; // Svelte 4: we'd have to create asserted variable here ↓
	$: filteredNumArray = numberArray.filter((element) => Boolean(element)) as number[];
</script>

{#each filteredNumArray as item}
	<p>{Math.floor(item)}</p>
{/each}
As the size of applications grow and you start dealing with complex types, having this new typescript syntax in your .svelte components is a huge win.
Conclusion
It’s likely we can begin measuring the upcoming release date of Svelte 5 in just days now.
Runes has knocked a lot of the familiar processes for 6, but once you spend 20 minutes developing a quick feature with them, it’s pretty straightforward. Some of the design approaches are still up in the air, so there’s every likelihood some of the runes will be amended, either under the hood or explicitly in the API.
There’s a lot of edge cases which might trip you up with Svelte 5, so if your app isn’t compiling properly despite following the guidance in this article, check this full list of breaking changes to see if any is relevant to you.
If you’re playing around with the Svelte 5 preview and spot a bug, don’t forget to pop it in their Github Issues page. And while you’re there, check out the milstones for version 5.0 so you have a better idea what’s coming up.
Hope you learnt lots from this article! ❤️