The SvelteKit 2 Migration Guide
| Published: January 23, 2024
| Updated: January 23, 2024
If you haven’t heard, SvelteKit 2 is out! The new version brings with it some unique new features, and also a few API changes that you’ll need to look at before migrating.

I released a SvelteKit 2 post discussing most of the major changes, which centered mostly around the shallow routing feature. As much as I love this feature, there’s plenty of apps that first need to move their codebase to the new version before they can think about implementing this in their app.
It’s important to keep up your apps up to date with the latest version in the interest of:
- minimizing tech debt,
- making sure dependencies are bug free,
- security of your code, and the dependencies you use,
- and also just being able to have access to developer and UX enhancements that are introduced.
So this article is for the developers who have an existing SvelteKit app made with a version below v2.0. We’ll first look at the important breaking API changes, and then walk through the process of upgrading. The Svelte team have released a tool which helps us through this process, however it’s important you get this right!
Check if you’re already using SvelteKit v2
First of all, let’s make sure you’re not already running version 2.
If you made your project before the 14th December 2023, it’s likely you are running an earlier 1.x.x version, and should follow this migration guide.
You can check your exact version going to your package.json file. Find the @sveltejs/kit package in your devDependencies, and see if the version is under 2 (ignoring any symbol, like the carrot ^):
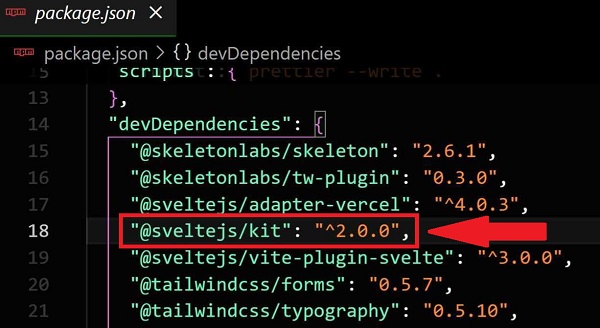
If your version is 2.0.0 or above then you don’t need to go through this guide.
But for the rest of us, I’ll walk you through each step to get to the wonderful land of version 2.
Prerequisites
There are a few things you must make sure of before we begin the process of migrating to v2, and these are:
- You must be using Svelte v4.
- It’s recommended you are running the latest version of SvelteKit
1.x - You must be Node version 18.13 or above
Make sure you are using Svelte v4
As SvelteKit uses the Svelte language to build components, it is required you use at least Svelte v4.0.
You can check your current version of Svelte in your project by going to your package.json file and looking for svelte in your devDependencies.

If the version you currently run is less than 4.0, follow the Svelte 4 Migration Guide to get yourself up to speed.
Update to the latest version of SvelteKit v1.x
Before doing the major jump to v2, you’ll likely have a few deprecations inside your own app at the v1 level that should be ironed out.
You can do this in your terminal by running running the following command:
npm install @sveltejs/kit@1Which will install the latest 1.x.x version.
Or if you’re running yarn or pnpm, run:
- Yarn:
yarn add @sveltejs/kit@1, - pnpm: `pnpm add @sveltejs/kit@1
Then try to build your app with:
npm run buildAnd see if the compiler yells at you. If so, fix the specific issues and then we can move on.
Check you’re using Node Version 18.13 or higher
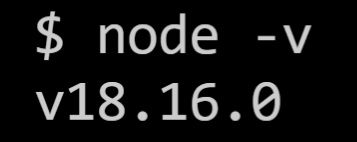
You can check the version of Node in your terminal by running the following command:
node -vAnd it will spit out the node version you’re running on your machine.
If you need to upgrade your node version, there’s a few ways, but the easier way to do it is:
Install latest Node version in Windows
The easiest way to update to the latest Node version with Windows is to reinstall from the .msi file on the Node website.
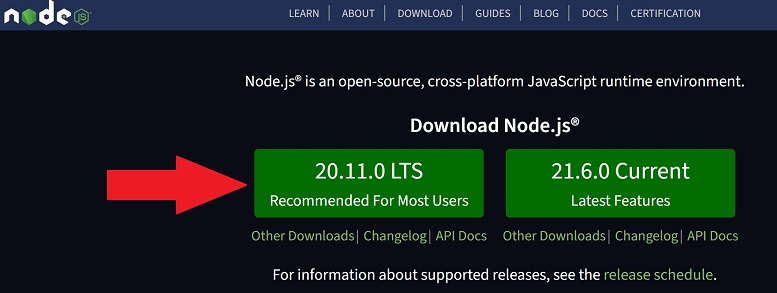
If you click the button labelled “Recommended For Most Users”, it’ll download the .msi file, which you can double-click when finished, and follow the default install.
Once this is done, you should be compliant with the SvelteKit v2 requirements!
Install latest Node version with Mac/Linux
With Mac or Linux, it’s as simple as running this following command
npm install n -gOnce it’s finished downloading and installing, you should have the latest Node version which is required by SvelteKit v2.
The dependency list
If we’ve done everything correctly so far, we should be ready to get started with the main part - the actual migration to v2!
But for reference, here is a list of the updated dependency requirements when moving to version 2.
The process we are about to use will update this all for you, however it’s there if you want to deeper understand what’s happening.
Ok, let’s migrate!
The Migration Process
The Svelte team have built the svelte-migrate to help us update version seemlessly.
The svelte-migrate tool
This tool will take care of most of the changes under the hood, including updating all the necessary dependencies, and also making changes to the compiler options in your tsconfig.json file.
We can use this tool from our terminal by running the following command:
npx svelte-migrate@latest sveltekit-2This will migrate some of the changes automatically, without having to worry about what’s happening under the hood.
This includes updating your package.json, and some other configuration changes, including:
- updating the
tsconfig.json, which now uses"moduleResolution": "bundler", and - the
verbatimModuleSyntax, which replaces theimportsNotUsedAsValuesandpreserveValueImportsflags in yourtsconfig.json.
If you’re not using the svelte-migrate tool, and have either of the importsNotUsedAsValues and preserveValueImports flags in your tsconfig.json compilerOptions, you should remove them. You should also make sure in the compilerOptions in your tsconfig.json file has the property "moduleResolution": "bundler", as shown below:

That should be the automatic changes done for you, so now we’ll need to work on the manual stuff!
Things you’ll need to change manually
The parts of our code base which we’ll need to change are the following:
- Every instance of
throw errororthrow redirectshould remove thethrow, i.e. they must change toerror, andredirect, respectively. - When setting cookies, you must include a
pathproperty in thecookies.setoptions. - An
awaitmust be added to top-level promises if yourloadfunctions should be blocking. - Make sure any instances of the
goto()with an external URL are changed towindow.location = url. - Make sure
pathsare either always relative, or always absolute, depending on the value of yourpaths.relativeproperty in yoursvelte.config.js. - Remove any instances of server tracking URL’s in your
fetchfunctions, and remove thedangerZone.trackServerFetches, as it no longer exists. preloadCodecan also only take 1 argument now - thepathname, which must be prefixed with thebasepath, similarly topreloadData.- Change all instances of
resolvePathtoresolveRouteand make sure you understand that it now it includes thebasein the resolved route - so if you havebase + resolvePath(), it should now becomeresolveRoute(). - Change dynamic environment variables (
$env/dynamic/public, and$env/dynamic/private) to static environment variables ($env/static/public, and$env/static/private) where possible. Dynamic variables aren’t used for prerendering anymore. - In all instances of calling the
use:enhancecallback for forms, if theformordataproperties are used, they must be changed toformElementandformDatarespectively. - Make sure the attribute
enctype="multipart/form-data"is added to all file inputs (i.e.<input type="file">) in your forms. Without this attribute, any non-JS submissions will omit the file when submitting. - If you use either
pathsorbaseUrlin yourtsconfig.jsonfile, make sure you convert them to thealiasoption. - Update your
vitePreprocessimports fromimport { vitePreprocess } from '@sveltejs/kit/vite'toimport { vitePreprocess } from '@sveltejs/vite-plugin-svelte'. This should be imported in yoursvelte.config.jsfile.
So there you have it. Some of the changes would have already happened with svelte-migrate, however most of these will be quick fixes, and the whole process should take no more than 10 minutes for most apps.
For the rest of this article, we’ll walk through these steps in more detail so that you should have no problems.
1. Remove the throw for error and redirect
This is straightforward. You simply must remove the throw keyword whenever using it in conjunction with error or redirect throughout your entire app.
If you’re using VS code, you can find all instances of this easily in your sidebar.
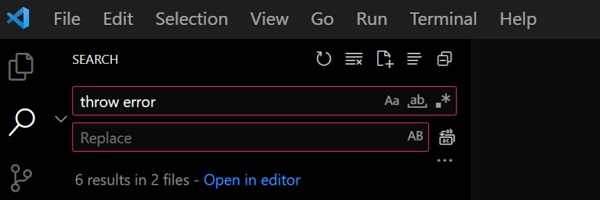
Click the Search Icon (magnifying glass) to open up your “search through codebase” panel:
Once you do this, you should see the search panel pop out. Then you should type throw error into the search box:
And below it, you’ll see a list of every instance of throw error in your app, which you can click on and it’ll take you precisely to the line, where you can remove throw.
If you’re a little gung-ho, you can type error in the “Replace” row in the search panel, and click the “replace all” button next to the input to replace all instances of throw error to error in your codebase:
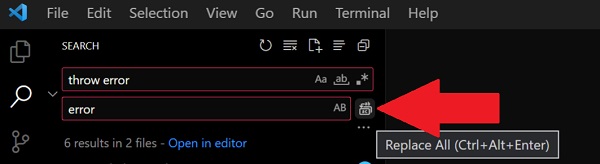
While this is convenient, it’s slightly risky as you might be editing something you don’t mean to. It should be safe in 99% of cases, however sometimes it’s good to eyeball every change.
And once you’ve done that, you just need to repeat the process with throw redirect. Where you need to just use the keyword redirect.
NOTE: We’ll use this search feature a lot throughout the rest of the guide, so just remember this when “search for all instances” gets mentioned below.
2. Include a path when setting cookies
We need to first search for all instances of cookies.set in our codebase.
If any any instance is missing options with the path property, and add it.
The value you use for path is the scoping to which the cookie gets applied. So if you want the cookie to apply to your entire app, use /:
cookies.set(name, value, { path: '/' });If you want it to only apply to the current path, then use '':
cookies.set(name, value, { path: '' });Or for the current directory, .:
cookies.set(name, value, { path: '.' });If you want to get more advanced with your cookie scoping, see the Mozilla web docs for path details.
3. Add an await to top-level promises in your load functions
If you want blocking behaviour in your load functions, you now need to await them.
In SvelteKit v1, you could return the promise, and it would await it for you.
For example, you might have a load function that looks like this:
export function load({ fetch }) {
	const response = fetch(endpoint).then((r) => r.json());
	return { response };
}
Where the response is was automatically awaited before being sent to the client.
However, now that load function streaming is available in SvelteKit, it is no longer awaited, so you’ll need to explicitly await the fetch call, otherwise you’ll pass the streamed object to the client, rather than the result
You can do that by making the load function async and adding await before the fetch keyword:
export async function load({ fetch }) {
	const response = await fetch(endpoint).then((r) => r.json());
	return { response };
}
Now the response will be blocking, and you can send the fetch response to the client, rather than a streamed promise.
Awaiting several promises in your load functions
Now that you must await promises in your load functions, this means that waterfalls can begin to occur when you make the changes mentioned above for instances where there are multiple promises.
In order to prevent the waterfall that would occur with this behavior, you can make use of Promise.all() if you need to await many fetches.
For example, if you were to await a series of promises like this:
export async function load({ fetch }) {
	const responseA = await fetch(endpointA).then((r) => r.json());
	const responseB = await fetch(endpointB).then((r) => r.json());
	const responseC = await fetch(endpointC).then((r) => r.json());
	return { responseA, responseB, responseC };
}
You’re going to be waiting a long time, as endpointB only begins fetching once the response of endpointA is returned, and the same goes for responseC.
But if you utilize a Promise.all() like this:
export async function load({ fetch }) {
	const [responseA, responseB, responseC] = await Promise.all([
		fetch(endpointA).then((r) => r.json()),
		fetch(endpointB).then((r) => r.json()),
		fetch(endpointC).then((r) => r.json())
	]);

	return { responseA, reponseB, responseC };
}
You won’t have a waterfall between the fetch calls, and your wait time will only be as long as the longest fetch call.
4. Change goto(externalUrl) to window.location
The goto() helper is a way to programmatically navigate to pages inside your app.
In SvelteKit v1 you could use it to navigate away from your app, however with the introduction of Shallow Routing in v2, the interface has changed.
So, use the search feature in your IDE to find all instances of goto, and make sure each of their parameters is to a URL inside your app.
If it is to a URL outside of your app, change it from this:
await goto(externalUrl);to this:
await window.location = externalUrl5. Make sure paths are either always relative, or always absolute
First, we need to see what’s happening in the config of your svelte.config.js file.
Look for const config = {...}. It should look something like this:
const config = {
	extensions: ['.svelte'],
	preprocess: [vitePreprocess()],

	kit: {
		adapter: adapter(),
		paths: {
			relative: true
		}
	}
};
Perhaps in your config.kit options, you haven’t declared a paths option, which is fine. By default, paths.relative is set to true, and therefore you must use relative directories when importing from $app/paths throughout your app.
6. Remove instances of server tracking URL’s in fetch functions
You’ll need to look for dangerZone.trackServerFetches throughout your app and remove every instance.
So in your IDE’s search panel, search for dangerZone. If you have no instances where you used this in your app, then you are okay to proceed.
However, if you have this anywhere in your app, you’ll have to remove it as it’s not longer an option with v2.
The problem was that the fetched URL’s in server load functions could expose environment secrets if the URL contained them.
7. Only use 1 argument for preloadCode and prefix it with the base path
First, search for all instances of preloadCode in your app, and make sure it only has 1 argument. This argument should be the pathname, including your base path.
So if you were using relative paths for the preloadCode functions, you must change it to make sure the base path is now included.
8. Change resolvePath to resolveRoute and remove any instances of base with it
Once again, we’ll use the search feature to look for any instances of resolvePath in our app.
For each instance, we need to make sure of 1 things:
- the
resolvePathkeyword must becomeresolveRoute, and - If you appended the
baseto theresolvePathvalue, you can remove it as theresolveRoutevalue will include thebasefrom$app/paths
So if you have a line of code like this:
import { resolvePath } from '@sveltejs/kit';

const path = resolvePath('/blog/[slug]', { slug });
Or a block of code that looks like this:
import { resolvePath } from '@sveltejs/kit';
import { base } from '$app/paths';

const path = base + resolvePath('/blog/[slug]', { slug });
You can change both of them to this:
import { resolveRoute } from '$app/paths';

const path = resolveRoute('/blog/[slug]', { slug });
Because resolveRoute already includes the base that your were importing from $app/paths.
Also, note that you’ll need to update the import from @sveltejs/kit to $app/paths.
The svelte-migrate tool will do this for you, however in the second code block mentioned with base prepended to compose path, you’ll need to manually remove the ”base +” yourself.
9. Change Dynamic Environment Variables to Static where Possible
With SvelteKit v2, dynamic environment variables won’t be used for prerendering anymore. So if you require environment variables in your app, it’s a good idea to change every instance to import them statically at the build stage, where possible.
If you must import them dynamically, just know that when a prerendered page attempts to access a dynamic environment variable, it will request an up to date value from the server, rather than reading it from the server rendered HTML. This behavior can be configured with in your svelte.config.js file, inside config.kit.env.publicModule.
If you’re not sure whether you need the environment variable to be dynamic or static, you can get more information in the SvelteKit official docs.
How to update dynamic environment variables to static as a precaution
So, in your IDE search panel, search for all instances of $env/dynamic/public.
You’ll have to look at each instance manually and assess if the value that’s being imported would be the same at build time as to the time it gets accessed and used when your app is being used.
For example, let’s say your app accesses a Google API, and they give you a key to use in your app. As this key shouldn’t ever really change, you should be able to use it statically.
So, in this case, you would change:
import { ENV_VARIABLE } from $env/dynamic/publicto:
import { ENV_VARIABLE } from $env/static/publicAnd the same goes for private environment variables ($env/dynamic/private). Just change dynamic to static, regardless of whether it’s public or private.
10. Change form to formElement and data to formData for the use:enhance callback
If you’ve used the SvelteKit use:enhance feature for form submissions, you often pass an object to the callback which contains a handful of properties. With SvelteKit v1, you could utilize form and data within your callback, however with v2, you’ll have to change it to formElement and formData, respectively.
You can find all instances of this in your project by searching use:enhance in your IDE’s Search Panel.
You won’t be able to use the ”Search and Replace all” method with step as there should be multiple instances of form and data that you’ll need to retain.
So go through each instance of use:enhance, and you should see something like this:
<form method="POST" use:enhance="{({" form, data, action, cancel, submitter })="">
	{         // Do something with callback object properties         return async ({ result, update
	}) => {             // Do something with result, or update         };     }} >
	<!-- Form contents -->
</form>
In all instances you see this line:
use:enhance={({ form, data, action, cancel, submitter })Make the changes:
form=>formElement, anddata=>formData
So that it should now look like this:
<form method="POST" use:enhance="{({" formElement, formData, action, cancel, submitter })="">
	{         // Do something with callback object properties         return async ({ result, update
	}) => {             // Do something with result, or update         };     }} >
	<!-- Form contents -->
</form>
11. Add the enctype="multipart/form-data" attribute for all file inputs
If you wish to have your file submitted for your forms in non-Javascript environments, then you’ll need to add enctype="multipart/form-data" to each instance of your <input type="file" />.
So this:
<input type="file" />will become this:
<input type="file" enctype="multipart/form-data" />And now when a user without Javascript submits the form, the file won’t be omitted.
In order to find all instances of this in your project, I’d normally suggest you use the “search” feature in you IDE panel to search for <input or type="file", but you could be missing instances with this alone. So you’ll have to dig deep here and use the following search queries to find all instances of <input type="file" />:
<input,type="file"(with double quotations ""),type='file'(with single quotations ”),type={"file"}(double quotes surrounded by braces),type={'file'}(single quotes surrounded by braces),
And you should also check if you’re using a library or custom component which abstracts the file input away to its own component, for example <FileInput />.
For most projects, using the list of queries above is exhaustive enough, however it’s up to you to find every instances of this in your project as it could be implemented many different ways.
12. Move to the alias option from paths and baseUrl in your tsconfig.json file
In your tsconfig.json file, you might have the paths or baseUrl properties in your compilerOptions:

If you don’t have these properties in your tsconfig.json file then you can move onto the next migration step.
However, if you do have these properties there, then we want to:
- Remove both the
pathsandbaseUrlproperties in thistsconfig.jsonfile, and - Add the
aliasproperty to oursvelte.config.jsoninside theconfig.kitobject. How you configure youraliasproperty should be to taste, however it’s worth understanding thisaliasproperty - which you can learn about in the SvelteKit docs.
So once you’ve configured your alias property in the svelte.config.json file, it should look something like this:
const config = {
	extensions: ['.svelte'],
	preprocess: [vitePreprocess()],

	kit: {
		adapter: adapter(),
		alias: {
			'@': 'src/lib/contacts.ts',
			components: 'src/lib/components'
		}
	}
};
Yours should be configured differently, however in this example, you should be able to import contacts with:
import contacts from '@';and
import { Banner, Accordion } from 'components';Moving away from the paths and baseUrl in the tsconfig.json towards an alias in the svelte.config.js file is more explicit, and SvelteKit v2 will warn you if you don’t do this.
Remember, you only need to do this step if you have the paths and baseUrl properties in your tsconfig.json file.
Most of the times, it’s fine leaving SvelteKit with the default settings and having none of the paths, baseUrl or even alias properties.
13. Update your viteProcess imports
Using your search panel in your IDE, search for vitePreprocess, and go through each instance where it says:
import { vitePreprocess } from '@sveltejs/kit/vite';and change it to:
import { vitePreprocess } from '@sveltejs/vite-plugin-svelte';For most projects, this should only be in your svelte.config.js file, however it can’t hurt to search for it if it exists more than one.
Conclusion
You made it! 🎉
You’ve now successfully migrated to the new shiny SvelteKit v2, and have access to all of its improvements and upgraded security.
Now that you’re here, check out some of the new features in SvelteKit v2 that are available to you.
I hope this detailed guide was helpful!