Let's Build an API with SvelteKit
| Published: January 15, 2024
| Updated: January 28, 2024
SvelteKit is the newcomer for building full-stack applications out of the box in 2024. It uses Svelte components for the front-end and Node.js for it’s backend, which means developers can easily develop on both aspects having to change languages or interrupt workflow.
To build these full-stack applications however, it’s a very natural process if you have any backend or Node.js experience. SvelteKit employs an uncomplicated approach to routing, and there are a handful of helper functions to help write clean logic in your RESTful API’s.
In this article we’re going to focus on the backend side of SvelteKit, and how requests are best consumed and emitted. We’re going to first touch on some of the SvelteKit fundamentals, and then apply those to a real-life API.

The methods discussed in this article can be used to build SvelteKit full-stack applications, however the API sections can also be used to create a standalone API without a frontend.
Before you start, it’s a good idea to have an understanding of the SvelteKit backend as a whole before diving into this article.
So, let’s start with routing in SvelteKit.
SvelteKit Basic API Syntax
SvelteKit Routing for API’s
In SvelteKit, all API endpoints will be declared and written in +server.ts files.
The way in which you target a specific +server.ts endpoint in a URL is by following the absolute folder-path from src/routes, and the final URL nesting is the title of the +server.ts parent folder.
Things to know about SvelteKit Endpoints
Generally speaking, SvelteKit endpoints a json based, therefore API endpoints can return json, and this is simplified by using the json package from @sveltejs/kit. This creates a JSON Response object from the data supplied to it.
For example,
import { json } from '@sveltejs/kit';

export async function GET(event) {
	// ... endpoint logic
	return json(dataToReturn);
}
Streaming Responses
Streamed responses are a common part of the web now, and often you might need to stream a response to the client. This could be for edge runtimes, or streaming AI generative responses etc.
The json response method shown above is the most simple way to return data to a requester, however you can also return a Readable Stream by returning a simple new Response(dataToStream).
So for a simple example like the one above would become:
export async function GET(event) {
	// ... endpoint logic
	return new Response(dataToReturn);
}
Or if you were doing a complex stream like a response from OpenAI, you could do:
import { error } from '@sveltejs/kit';

export async function GET(event) {
	// ... endpoint logic
	const chatResponse = await fetch('https://api.openai.com/v1/chat/completions', {
		headers: {
			Authorization: `Bearer ${OPENAI_KEY}`,
			'Content-Type': 'application/json'
		},
		method: 'POST',
		body: JSON.stringify(streamChatOptions)
	});
	if (!chatResponse.ok) {
		const err = await chatResponse.json();
		error(500, err.error.message);
	}
	return new Response(chatResponse.body, {
		headers: {
			'Content-Type': 'text/event-stream'
		}
	});
}
Since the chatResponse is a streamed Response, we consume it through the server, and also stream the chatResponse to our client.
Endpoint Errors
You may have noticed the error checking in the last code block. If you’re new to SvelteKit, you don’t need to throw errors.
Since SvelteKit v2, the API changed:
- SvelteKit v1: from requiring to
throwan error:throw error(500, 'There is a problem'), to - SvelteKit v2: not needing to
throwand simply letting the@sveltejs/kithandlethrowfor you, i.e.error(500, 'There is a problem').
The same goes for redirect in SvelteKit. If you need to redirect from the server function, you can use this:
redirect(307, '/login');Again, there’s no need to throw in v2.
You can read more about the error handling changes in v2 here.
So now we know the basics, let’s create our API!
Create a GET Endpoint
To create an endpoint, you must:
- Create a folder anywhere within the
src/routesdirectory, and call the new folder the name of your endpoint (e.g.src/routes/company-details), then - Within the folder, create a
+server.tsfile, which is where the logic for the endpoint is declared.
So, say you want to create a public API that returns the details of your company in JSON format. Then, create the file src/routes/company-details/+server.ts, and pass the following logic.
import { json } from '@sveltejs/kit';

export async function GET(event) {
	const companyDetails = {
		name: 'My Company',
		employees: [
			{ name: 'John Doe', salary: 45000 },
			{ name: 'Jane Larkin', salary: 42000 },
			{ name: 'Jim Salmon', salary: 38000 }
		],
		customers: [
			{ name: 'Bills Toys Inc', income: 30000 },
			{ name: 'Silly Co', income: 25000 },
			{ name: 'Rox R Us', income: 20000 }
		]
	};

	return json(companyDetails);
}
The parent folder of the +server.ts file is the name of endpoint, and therefore can be accessed by going (or making a GET request) to https://website.com/company-details, which will return a JSON object:
{
    "name": "My Company",
    "employees": [
        {
            "name": "John Doe",
            "salary": 45000
        },
        // And the other employees...
    ],
    "customers": [
        {
            "name": "Bills Toys Inc",
            "income": 30000
        },
        // And the other customers...
    ]
}
Pretty simple and straightforward. And then if you wanted to call this from a client, you’d make a request that looks like this:
async function getCompanyDetails() {
	const response = await fetch('/company-details', {
		method: 'GET',
		headers: {
			'content-type': 'application/json'
		}
	});

	const companyDetails = await response.json(); // Do something with companyDetails...
}
The 2 things to look out for here are the:
- The Absolute URL, as it relates to the
src/routesfolder. All endpoints follow the folders relative to thesrc/routes, e.g. if you’d prefer your API behttps://website.com/api/company/company-details, then you’d make the directorysrc/routes/api/company/company-details/+server.ts. - Using the
jsonhelper function from@sveltejs/kitto format and return a compliantJSONResponseobject to the consumer… Which can then be unwrapped on a SvelteKit front-end by calling the.jsonmethod on the rawfetchresponse, (i.e.const companyDetails = await response.json())
With these 2 code-blocks alone, you can begin to make a full-stack application in SvelteKit. You first have the ability to send requests to your server API, and also the ability to consume and emit a responses back to the client.
But for a full CRUD application, you’re going to need to send data to the server for creating, updating and deleting data. So for that, you’ll need to make at least 1 POST endpoint.
POST Endpoints
In the example above, we were able to GET some hardcoded details about the company from an API. Now, we want to make an endpoint where those details are updated. This means that in our request, we’re going to need to send a request body.
So, let’s first add a POST endpoint to add customers to our customer list. We do this by creating the directory: src/routes/add-customer/+server.ts.
And in the +server.ts file, we’ll paste this:
import { json } from '@sveltejs/kit';
import { addCustomerToDb } from '$lib/db.ts';

export async function POST(event) {
	const { name, income } = await event.request.json();
	const addedCustomer = await addCustomerToDb(name, income);

	return json(addedCustomer);
}
There’s not much difference from the GET request, however, the 2 things to note are:
- The function name should be called POST to accept a request body,
- You may extract the object from the request
bodyby callingawait event.request.json(), and optionally destructure its properties, as is shown above.
And then you can return the JSON to the client as you did before, with the json package.
If a client wanted to make a POST request to this endpoint, they’d make this request:
async function addCustomer() {
	const response = await fetch('/add-customer', {
		method: 'POST',
		body: JSON.stringify({
			name: 'Mike McKay',
			income: '200000'
		}),
		headers: {
			'content-type': 'application/json'
		}
	});

	const addedCustomer = await response.json(); // Notify of the successful addition...
}
Just as with a GET request, you call upon the endpoint, and then unwrap the response with the json() method to get the details. The difference is that the fetch options must have:
method: 'POST', andbody: JSON.stringify(objectToSend)
The important data to send to the server is the body, where in this instance, you awanted to add a customer named Mike McKay, with an income of 200000.
API’s in SvelteKit are json based, so when you call an API, you must provide a stringified JSON body, and it’s response can be JSON, or streamed. So the body is stringified when sending it to the API, and then it can unwrapped on the server.
So now that you know the basics, you can go and implement the same thing for adding employees via and API endpoint.
You can even make endpoints where you delete employees from the system, or update their details.
For this, you would usually implement PUT, PATCH, or DELETE endpoints. With SvelteKit, these are called and handled in the exact same as POST requests, when sending data from a client, or consuming it on the server.
The only difference is naming the exported function in the +server.ts file, you would make it PUT/PATCH/DELETE instead of POST, for example:
export async function DELETE(event) {
	// function logic...
}Congratulations! You’d just made an API, where anyone can:
- get the company details and consume it in their app,
- create customers/employees, and
- delete and update their details
And as it stands now, it will return it for everyone who requests it. As there is no permission control yet, this is a public API. To make a private API, we’ll have to set some authorization logic.
SvelteKit API Permission Control
Often, you only want certain people to have access to this data, so you can require they validate themselves when calling your endpoint. This can be done with a query parameter in the URL, or they can add a Bearer token in their header, which you can extract and check if it’s correct.
This is effectively a password, or key to check if you should know what the server is about to tell you. If you don’t know the password, you don’t get the data!
So for simplicity, let’s create a key (password) string - we’ll set it to: key = 'givemethedata'.
So anyone in the world who knows that gets to have the data. If you don’t, then we’ll return an UNAUTHORIZED error.
So, let’s first look at how you can do this with a URL query parameter:
Method 1: Query Parameter
In this method, we’ll require the API caller includes the key in the URL like this:
https://website.com/company-details?key=givemethedata
You should only use this method for non-critical API access. It is the most convenient method, however attackers could gain access to your key from history data or logs.
So from the public endpoint we made above, we need to get the value of the key query parameter out of the URL.
const key = url.searchParams.get('key');Then we can check to see if the caller has entered the right key, and if not - then we would throw a 401 Unauthorized error.
if (key !== 'givemethedata') {
	error(401, 'Incorrect key');
}
But if the key is correct, we don’t throw the error, and continue to send the company details to the caller in JSON format.
import { json, error } from '@sveltejs/kit';
import type { RequestHandler } from './$types';

export const GET: RequestHandler = ({ url }) => {
	const key = url.searchParams.get('key');

	if (key !== 'givemethedata') {
		error(401, 'Incorrect key');
	}

	const companyDetails = {
		name: 'My Company',
		employees: [
			{ name: 'John Doe', salary: 45000 },
			{ name: 'Jane Larkin', salary: 42000 },
			{ name: 'Jim Salmon', salary: 38000 }
		],
		customers: [
			{ name: 'Bills Toys Inc', income: 30000 },
			{ name: 'Silly Co', income: 25000 },
			{ name: 'Rox R Us', income: 20000 }
		]
	};

	return json(companyDetails);
};
Now if someone wanted to access the company details, they could go to their browser and enter https://website.com/company-details?key=givemethedata, and it would display the raw JSON of the company details.
If you were to fetch this in Svelte, however, you’d access it like this:
const companyDetailsRes = await fetch('https://website.com/company-details?key=givemethedata');
const { name, employees, customers } = await companyDetailsRes.json();
Method 2: Accessing Bearer Token
If you have critical data behind an API, it’s worth taking the most secure method possible handling keys. So in this method, we require the API caller to pass the key as a Bearer token in their request.
Unlike the first method, the caller won’t be able to access this by simply entering the URL on their browser. This requires them to do a programmatic fetch, or use an interface like Postman.
Because we’re talking about SvelteKit, let’s see what a call to this API would look like in Svelte:
const companyDetailsRes = await fetch('https://website.com/company-details', {
	method: 'GET',
	headers: {
		'Content-Type': 'application/json',
		Authorization: 'Bearer givemethedata'
	}
});
const { name, employees, customers } = await companyDetailsRes.json();
It’s obviously more verbose than the last method, but it’s preferable from a security perspective.
So to process this in our API endpoint, let’s define the logic:
const bearerToken = event.request.headers.get('Authorization');
if (!bearerToken) throw error(401, 'No Bearer Token Provided');
const key = bearerToken.split(' ')[1]; // Removes the 'Bearer' Prefix
if (!key) throw error(401, 'Incorrect Key'); // Provide Company Details...
So now that we’ve pulled the key out of the headers, lets see the full example of the GET API:
import { json, error } from '@sveltejs/kit';
import type { RequestHandler } from './$types';

export const GET: RequestHandler = (event) => {
	const bearerToken = event.request.headers.get('Authorization');
	if (!bearerToken) throw error(401, 'No Bearer Token Provided');
	const key = bearerToken.split(' ')[1]; // Removes the 'Bearer' Prefix
	if (!key) throw error(401, 'Incorrect Key');

	const companyDetails = {
		name: 'My Company',
		employees: [
			{ name: 'John Doe', salary: 45000 },
			{ name: 'Jane Larkin', salary: 42000 },
			{ name: 'Jim Salmon', salary: 38000 }
		],
		customers: [
			{ name: 'Bills Toys Inc', income: 30000 },
			{ name: 'Silly Co', income: 25000 },
			{ name: 'Rox R Us', income: 20000 }
		]
	};

	return json(companyDetails);
};
Hooks
That’s the majority of what you’ll need to know to have a well-performing API with access control, CRUD features, and even streaming.
So if you set up your own API with several endpoints, you might be rewriting a tonne of code. So to save that, there is a hook feature in SvelteKit.
A server hook is some processing that happens before every request is processed by your endpoint.
So you can think of it as a little addition that does some processing, and then some data can get slipped into your endpoint.
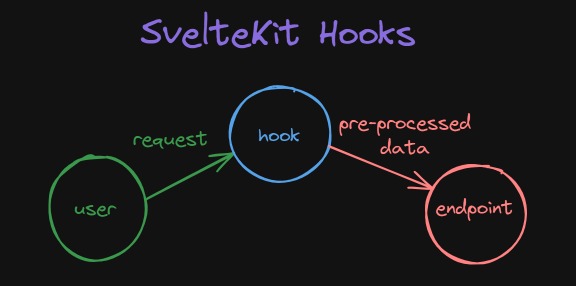
So to make a server hook, you must create a hooks.server.ts file in your root directory (i.e. src/hooks.server.ts)
A common utilization of hooks is to perform some authentication before proceeding with the endpoint process, e.g.:
import type { Handle } from '@sveltejs/kit';
import { getUser } from '$lib/db';

export const handle: Handle = async ({ event, resolve }) => {
	event.locals.user = await getUser(event.cookies.get('sessionId'));

	if (event.url.pathname.startsWith('/admin-panel') && !event.locals.user?.isAdmin) {
		error(401, 'Unauthorized');
	}

	const response = await resolve(event);
	return response;
};
We’ve used this hook to do 2 things:
- To set our
userproperty in ourevent.locals, which can then be accessed directly on any endpoint (+server.ts) or load/actions function (+page.server.ts), and - To check if they are attempting to enter an Unauthorized URL.
We could technically do this in every server function, but it’s generally a good idea to centralize some repeatable code, and hooks is good for this.
More generally, hooks can be applied to either server src/hooks.server.ts, client src/hooks.client.ts, or both (src/hooks.ts).
The rabbit hole goes deep with hooks, but so long as you understand what hooks do, consult the official SvelteKit docs and you can set fine-grain controls to control which hooks fire and when.
Conclusion
SvelteKit API’s are quite simple to make, and are a great option if you’re a Javascript developer.
Getting familiar with building them will help you when building full-stack SvelteKit apps, or you could focus only on the server logic and maintain the API alone without a client.
You can monetize your API through services like RapidAPI, or by using the Stripe API to process payments on your own platform.
You could even combine the two by creating your API docs using Svelte components, and a client page to register for your API service. You can use libraries like SveltePress to build simple docs with SvelteKit, or mdsvex if you’re just looking to process markdown in SvelteKit.
There’s loads of possibilities with SvelteKit API’s and I hope this article inspires you to go out and build one! ❤️